Critical Flows and Test Cases #critical-flows back to top
What is a Critical Flow?
Critical Flow is a checklist of High-Priority Test Cases and instructions to run those test cases. This is similar to the Test Suites we use in Software Testing. These cases have a set of specified formats and are useful for checking and testing a plugin.
They’re convenient for testing after changes (regression testing), before releasing the final build of the plugin, and for automation (end-to-end testing).
Format of Critical Flow
After conducting research and considering various use cases, we have established the following format for documenting the critical flow.
Example: ClassifAI Wiki
You will find two pages with the name:
Critical Flow
The Critical Flow page acts as a checklist and is organized into five sections:
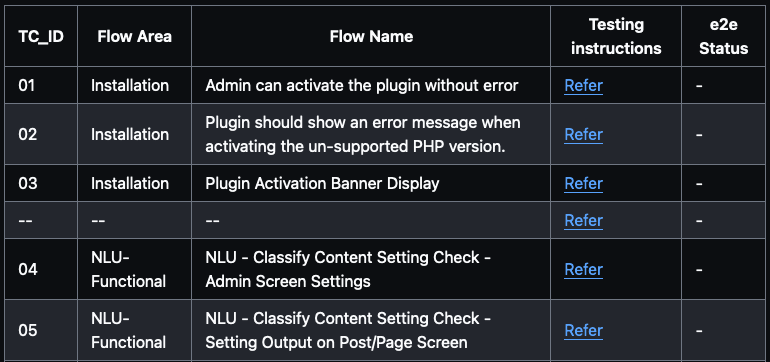
- User Type: This identifies the user role required to run tests, such as admin, editor, subscriber, etc.
- Area: This denotes the section of test cases related to a specific aspect like admin area, or frontend.
- Flow Name: This serves as the description or title of the test case.
- Testing Instructions: This provides a link to the specific test case’s testing instructions.
- E2E Status: This keeps track of whether an end-to-end (E2E) script has been written for the test case.
Testing Instructions for Critical Flow
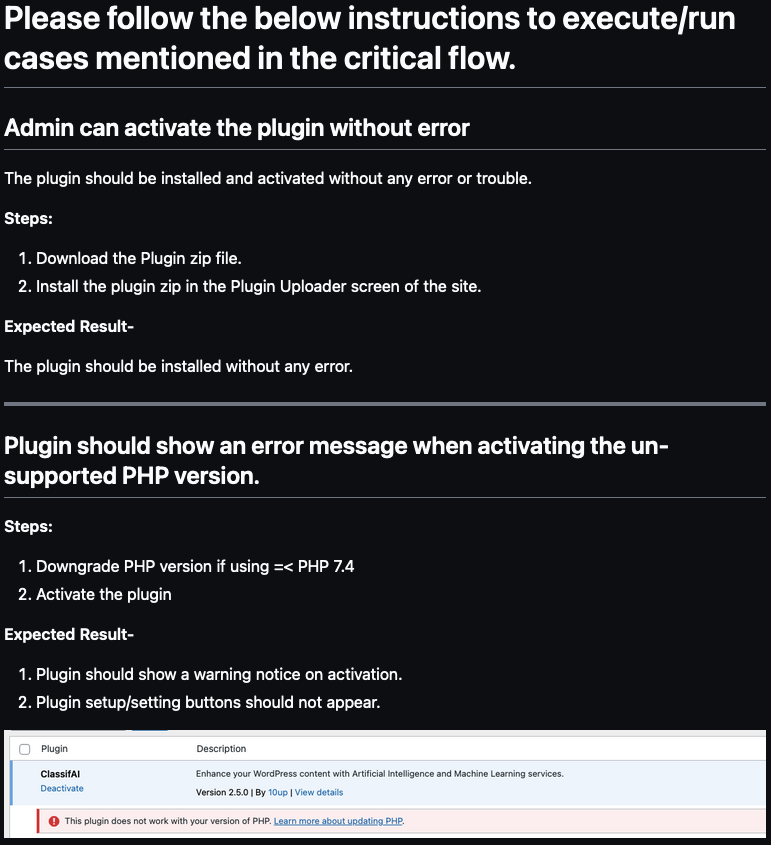
The Testing Instructions page serves as a guide for a person who is a beginner on the project and wants to run tests. This guide assists individuals in understanding “How to Test a Particular Test Case” by running “Testing Steps” and “Expected Results” after running the test.
This page includes the “Title” of the test case (the same title used in Critical Flow), “Testing Steps,” and “Expected Result.” Additionally, You can add any extra information, such as “Screenshots” or any other detail that will help the user to execute the test case easily.
Use of Critical Flow
The Critical Flow document serves various purposes within our workflow. Primarily, it aids in the following areas.
E2E Test Script Creation
Facilitating the development of end-to-end (E2E) test scripts, particularly for frameworks like Playwright or Cypress. The structured format of Critical Flow assists in translating testing requirements into automated scripts.
Manual Regression Testing
Enabling the execution of manual regression testing before releasing a new build. The checklist-style organization of Critical Flow ensures comprehensive coverage of test cases, helping identify potential issues and regressions.
Pre-Release Testing
Conducting quick tests before deploying a new build. The document ensures that essential test cases are verified to maintain the stability and reliability of the software.
Software Upgrade Checks
Performing tests before related software upgrades, such as those for WordPress or PHP versions. This proactive approach helps anticipate and address any compatibility issues that may arise during or after the upgrade.
In summary, the Critical Flow document plays an important role in our testing processes, supporting both automated and manual testing efforts across various scenarios, from E2E script development to pre-release and upgrade testing.
Location and Tools for Critical Flow
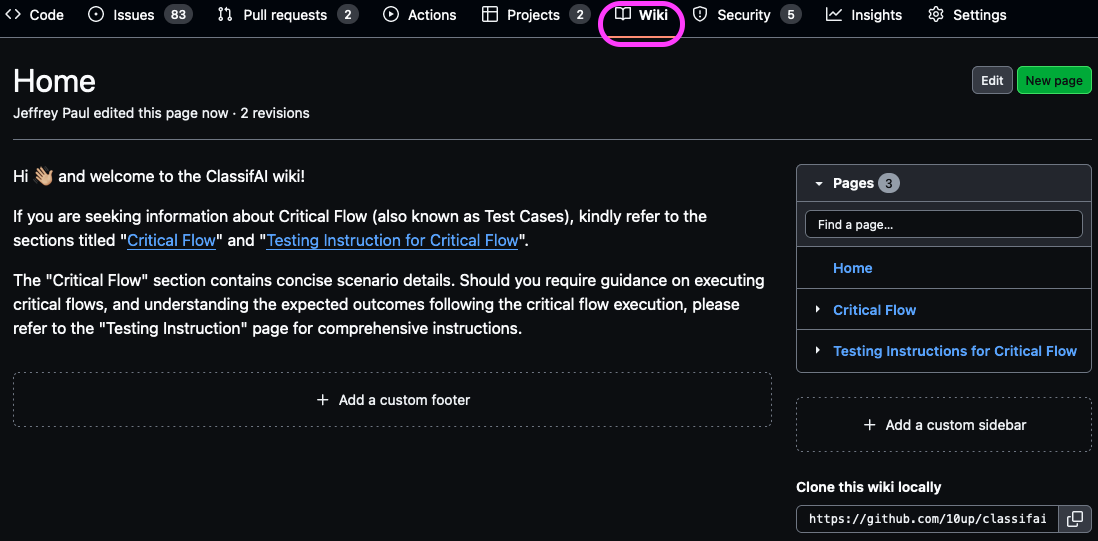
We have chosen GitHub Wiki Pages as the designated location for storing our test case documentation. If the Wiki tab is not visible in the GitHub project repository, kindly request your GitHub admin to enable the Wiki feature. Note that wikis are not available on private repos, so publicly open source your code! ;)
Code coverage #code-coverage back to top
Every feature should be accompanied by tests and all pull requests should come with associated tests, all living within the tests directory. While we have no intention of striving for 100% code coverage, we should aim for above 80% with above 90% being the ideal. We should also look to utilize a code coverage / automated code review tool like Coveralls, Code Climate, or Codecov and ensure that is a pull request requirement before merging.
E2E Testing #e2e-testing back to top
Testing environment
The environment should be accessible and easy to set up in both local and CI environments. In the WordPress context, the environment must also be configurable to fit as many scenarios as possible, including testing against different WP versions and with other plugins/themes activated. For the open-source projects, we also want to use a community-driven tool. Because of those reasons, we choose wp-env for 10up’s Open Source projects.
Test runner
Cypress is the tool we’re using for E2E testing. Cypress provides a great developer experience for writing the tests, including simple and familiar syntax and a powerful visual debugger. On top of that, Cypress gives us the most consistent results among the tools we tried.
Importing the test URL
In most cases, the URL of the test instance is http://localhost:8889. But this can be changed, so instead of hard-coding the URL, we import it from wp-env and merge it into Cypress config.
// tests/cypress/plugins/index.js
const { readConfig } = require( '@wordpress/env/lib/config' );
/**
 * @type {Cypress.PluginConfig}
 */
module.exports = async ( on, config ) => {
	wpEnvConfig = await readConfig( 'wp-env' );
	if ( wpEnvConfig ) {
		const port = wpEnvConfig.env.tests.port || null;
		if ( port ) {
			config.baseUrl = wpEnvConfig.env.tests.config.WP_TESTS_DOMAIN;
		}
	}
	return config;
};
Then in testcases, we can safely omit the URL:
cy.visit( `/wp-admin` );
Testing against multiple configurations
The purpose of E2E testing is to ensure the user-facing features work as expected. In the WordPress context, we can extend that purpose to “working as expected against supported WP versions and plugins/themes”. At 10up, we’re using GitHub Actions matrix and wp-env config override to solve that problem by generating wp-env config for each matrix.
Fixing permalinks issue
There is a known issue with file permissions. This prevents us to use permalinks in testing because the .htaccess file could not be created in the GitHub Actions environment. File permissions could be fixed with npm run wp-env run tests-wordpress "chmod -c ugo+w /var/www/html" during the initialization.
Debugging Cypress on GitHub Actions
In rare scenarios, tests may pass locally but fail on CI. To debug such cases, we use Cypress’ screenshot and video recording capabilities in tandem with the Upload Artifact Action.
Configuring Cypress to capture screenshots and videos of the tests is pretty straightforward. And, unless explicitly configured, Cypress will store the screenshots and videos under the cypress/screenshots and cypress/videos directories by default.
We configure the Upload Artifact Action to build an artifact out of these 2 directories, which will be later available to us for download and inspection.
The simplest configuration is as follows:
# actions.yml

- name: Upload artifacts
  uses: actions/upload-artifact@v2.3.0
  if: always()
  with:
    name: 'Cypress artifacts'
    path: tests/cypress/videos/
We used version 2.3.0 of the actions/upload-artifact action and configured it to always generate an artifact by setting if: always(). If you wish to generate them only when a job fails, then you can set it to if: failure().
Single login for all tests
Cypress automatically clears all cookies before each test to prevent state from building up. This requires to add login workflow beforeEach test and cause increase of total time for each test to pass.
Otherwise, it’s possible to preserve cookies from being cleared in each test suite or global support:
// tests/cypress/support/index.js
beforeEach(() => {
	Cypress.Cookies.defaults({
		preserve: /^wordpress.*?/,
	});
});
Then, the login command only needs to be added once before the test suite:
// tests/cypress/integration/some.test.js
describe('Test Suite', ()={
	before(()=>{
		cy.login();
	});

	it('Test one', ()=>{
		// ...
	});

	it('Test two', ()=>{
		// ...
	});
});
Display test results in the GitHub Actions summary
We utilize the new Markdown support of GH Actions summary to include the test results in the job summary.
To generate the markdown report, we use mochawesome reporter to generate JSON and HTML reports. We use mochawesome JSON reports by updating the Cypress configuration as follows:
// tests/cypress/cypress-config.js

module.exports = defineConfig({
    // ...other config options
    reporter: 'mochawesome',
    reporterOptions: {
        reportFilename: 'mochawesome-[name]',
        reportDir: 'tests/cypress/reports',
        overwrite: false,
        html: false,
        json: true,
    },
});
Then, an additional step in the Cypress workflow file to generate Markdown content from JSON reports and update it to GitHub Summary:
# action.yml

- name: Update summary
  if: $
  run: |
    npx mochawesome-merge ./tests/cypress/reports/*.json -o tests/cypress/reports/mochawesome.json
    rm -rf ./tests/cypress/reports/mochawesome-*.json
    npx mochawesome-json-to-md -p ./tests/cypress/reports/mochawesome.json -o ./tests/cypress/reports/mochawesome.md
    npx mochawesome-report-generator tests/cypress/reports/mochawesome.json -o tests/cypress/reports/
    cat ./tests/cypress/reports/mochawesome.md >> $GITHUB_STEP_SUMMARY
We configure this to always update job summary by setting if: $. If you wish to update the summary when a job fails, then you can set it to if: failure().